How ECM Works & Best Practices for Menu Deployments
Last updated: November 5, 2026
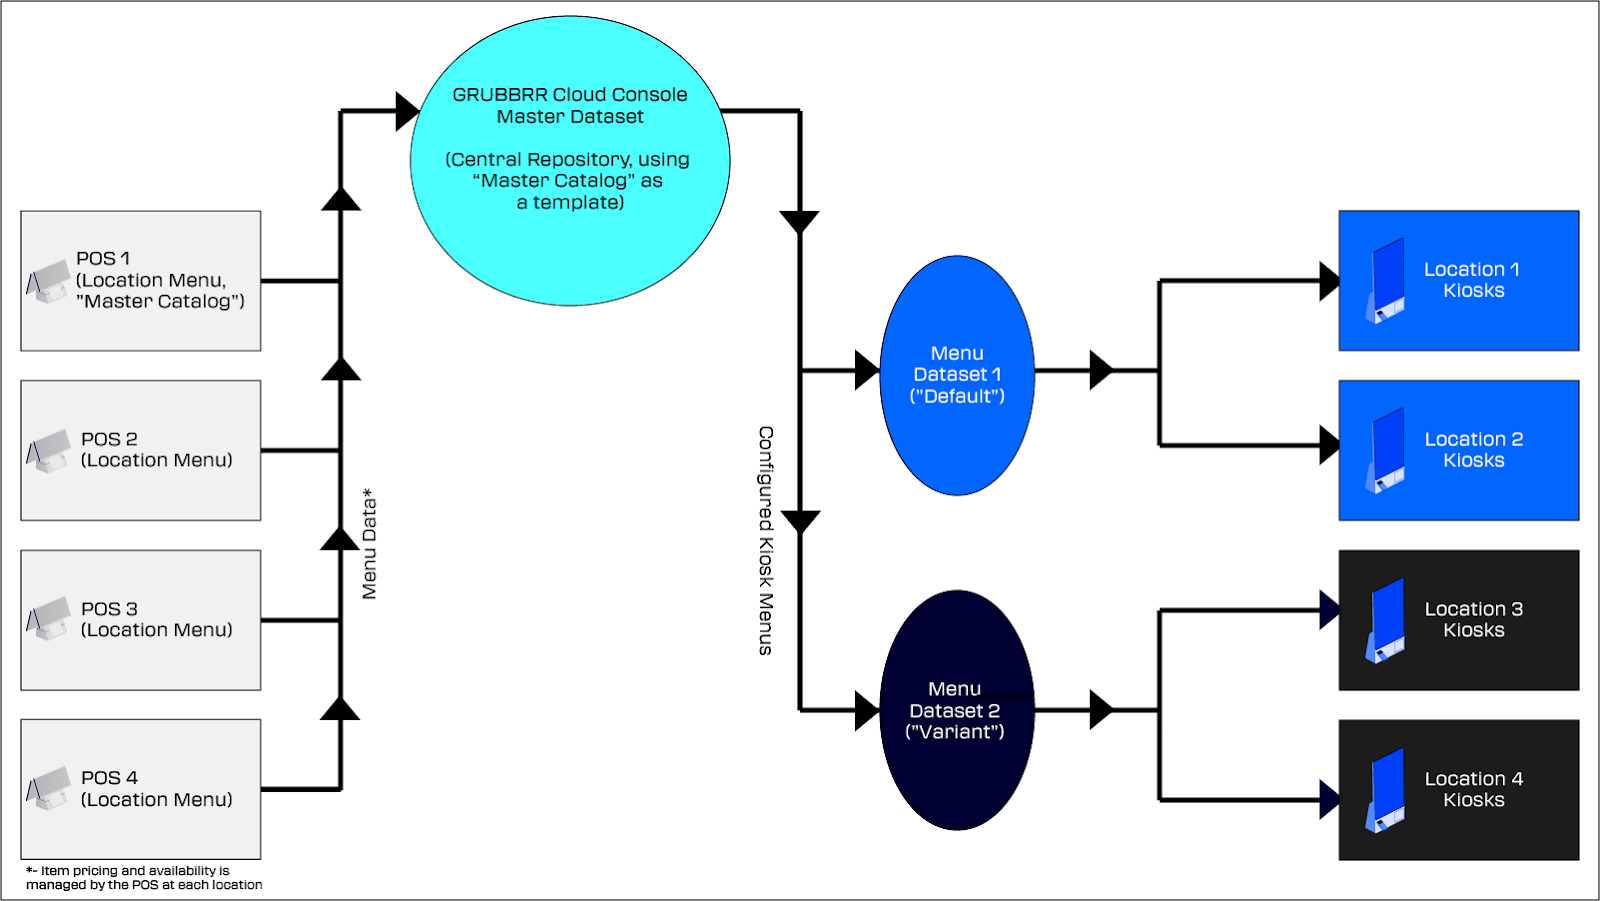
Enterprise Configuration Management, or “ECM,” is a custom menu management flow designed for larger brands using the GRUBBRR Console platform. ECM works with all POS integrations, but it is most useful for POS integrations that require users to make lots of overrides in the GRUBBRR Console, such as PAR or Simphony Gen 1.
Let’s take a look at how GRUBBRR imports and builds an ECM Menu.
Step 1: Collecting Data from the POS
Before we can set up a company-wide menu in ECM, we need to know what items the Kiosks will offer across all of your locations. So our first step is to set up the POS integration at all live locations, and pull those menus into the Console to create a central database.
Selecting the “Master Catalog”
When we’re onboarding the POS at each location, we’ll need to select one POS to serve as the “master catalog” for the organization. The console will then build a central repository called the “master dataset” using this menu as a template. As a best practice, GRUBBRR recommends setting a Lab environment as the “master catalog,” because it should have all available categories, items, etc. already enabled. This will help us build a clearer, more comprehensive Master Dataset right away, without needing to import “missing” items from other locations going forward.
Step 2: Editing the Master Dataset
Now that we’ve pulled all of the variations of the menu into the Console, we’re ready to start setting up a default menu for the brand. In the console, this is called the “Master Menu Dataset,” and it’s built with the combined information from all of the POS menus we’ve onboarded in the organization.
The Master Menu Dataset is where we’ll go to make any and all adjustments to the Kiosk menu, including:
Display Names and Images
Custom Display Orders
Cloning and modifying categories, combos groups, or modifier groups
Changing modifier display modes (builder mode, standard, pizza)
Setting modifier minimum and maximum selections
Creating and mapping custom items
Creating and managing upsells
Managing discounts
We should set the Master Menu Dataset up so that it is fully “Kiosk Ready,” with every possible option available. That way, we can just trim any unneeded categories or items from the datasets we push to live locations.
Step 3: Creating Custom Dataset
Once the Master Menu Dataset has been configured, we’ll create the “custom datasets” that we’ll push to locations. Each custom dataset is basically a list of which categories/items locations will offer from the Master Dataset.
We will always have to create at least one custom dataset, which will be the standard menu used across the majority of live locations. Beyond that, we should try to create as few datasets as possible; if we have to create too many datasets, we’re not getting full value out of ECM!
As a best practice, we should only create custom datasets when the Kiosk will offer different categories at different locations. For example, a GRUBBRR partner may offer a unique “Local Favorites” category at corporate stores, but not at franchisees. Assuming corporate stores are the majority, we would build the Default Menu dataset with the Local Favorites category, and create a variant dataset with the category removed.
Note: if all of a brand's locations use the same basic categories, but have some item-level differences, we would only create a single dataset for the organization. Then, we can go to the individual locations and use our location override tool to hide any items that shouldn’t be available.
Step 4: Managing Kiosk Datasets
In addition to configuring Menu Datasets, we can also set up Kiosk settings for the brand at the Enterprise level. Just like with menus, we’ll configure a Master Kiosk dataset, and then create at least one custom dataset to share to locations. Unless otherwise specified, we should only ever need one Kiosk dataset for all locations!
Step 5: Deploying the Kiosk Menu
Once we’ve set up our default and variant menu(s), we’re ready to share them to locations. With ECM, we don’t have a one-button “push to Kiosk” option; instead, we set up custom deployments to push the configuration to select locations.
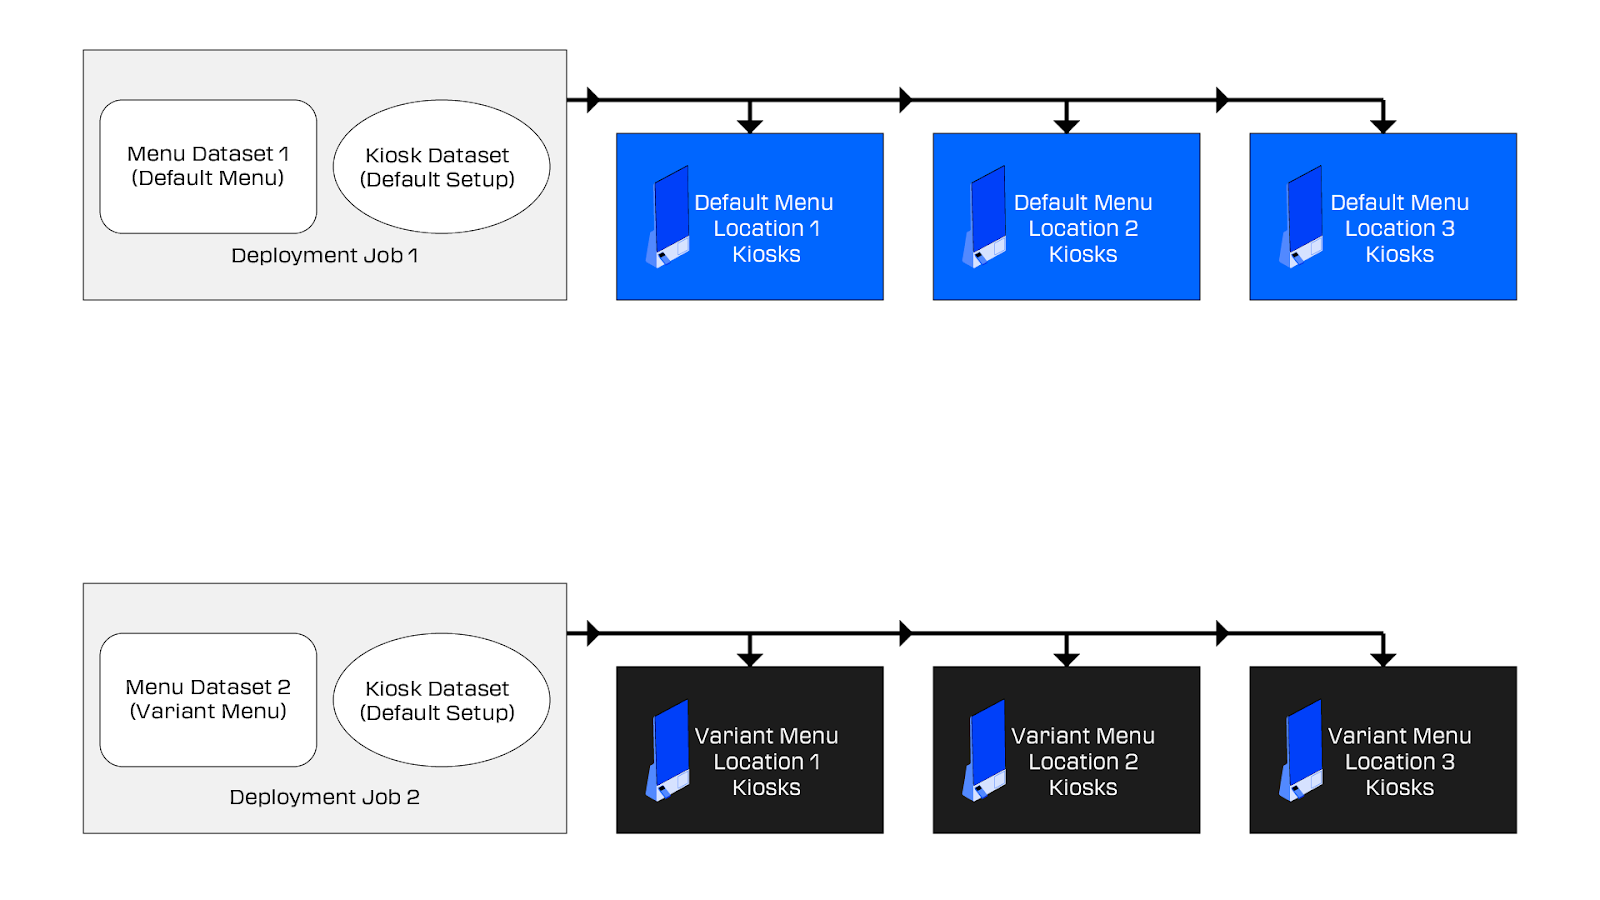
As a general rule, GRUBBRR’s product team recommends creating a “basic” deployment job for each variant of the menu. So, using our example above, we would have two deployment jobs: one for corporate locations, and one for franchisees. When we set up these jobs for the first time, we can assign which locations will be included, which datasets to share, and when to apply the changes. Then, for future menu or Kiosk updates, we can simply clone the existing jobs, and update the name to explain what changes we’re making.