How to add a Landing Screen to GRUBBRR Kiosks through the Enterprise Console
Last updated: September 4, 2026
GRUBBRR Kiosks operating on version 15.4+ can be set up with a fully customizable landing page. This screen is automatically shown on the Kiosk when a user taps to enter the menu, and allows us to display curated media and quick-links to featured items and categories before the customer begins browsing the menu. You can see a fully configured landing screen in the image below.
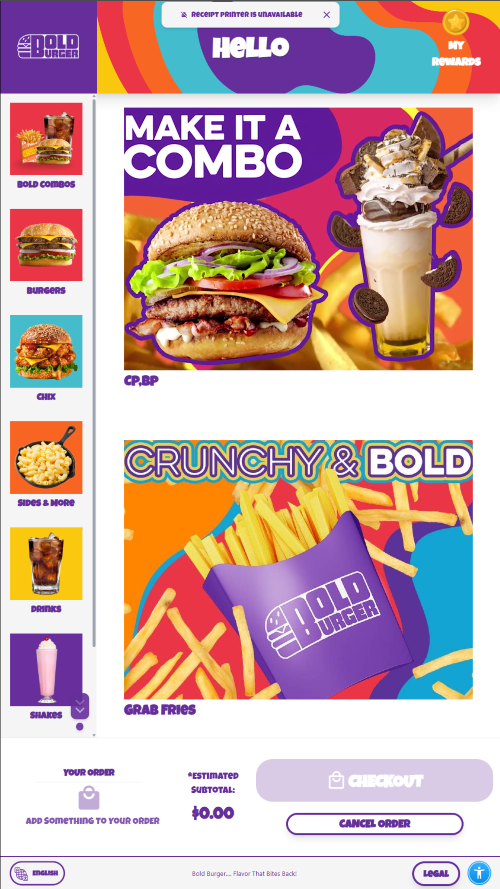
Landing Screens can be enabled and configured in the "Appearance" section of the Kiosk Settings menu in the Console, either at the location level or as part of an enterprise Kiosk dataset. For this guide, we'll show you how the configuration works at the location level.
Go to console.grubbrr.com
Navigate to the location that you want to configure, then select "Kiosk Settings" in the Console sidebar
For brands using Enterprise management, you will need to switch to Enterprise view then open the "Master Kiosk Dataset."
Click "Appearance"
Select "Kiosk Appearance" in the dropdown
Scroll to the bottom of the screen to find the "Landing Screen" section
To add a new element to the landing screen, click the "Add Asset" button
Each asset requires multiple different components; first, we'll need to upload media for the element
The Kiosk supports .jpg, .png, .gif, animated .webp, and .mp4 files. Please note that any files we upload should be 5MB or less.
Optional: If you want to include a text description of the element on the Kiosk, you can enter it in the "Asset Name" field
You can leave this field blank if your asset already includes text for a "Call to Action."
Next, we'll define what each element actually does using this dropdown
For the first release of this feature, an asset can either redirect customers to a specific menu item, or to a menu category.
You will also need to define the end destination of the link in a second dropdown
You can add up to four total assets per row
Note: the Kiosk adapts the size of each tile based on the number of assets in a row. It's important to review the resolution of any media you upload, so that it doesn't look pixelated or squished on the Kiosk.
You can add up to five rows of assets to the landing screen by clicking here
If desired, you can add a header to your landing page; this can be plain text
Or a combination of text and media
The Landing page header supports all of the same file types as the asset tiles.
You can see a preview of any header media you upload here
Remember to save and sync your changes to see them on the Kiosk
Recommended Dimensions for the Landing Screen
The layout of the landing screen is dynamic, so every row can have a completely different format (e.g., row 1 might have one banner, while row two might have three smaller tiles). So, when uploading assets, make sure to approach each row separately, based on the dimensions outlined below. For your convenience, a visual guide to asset layouts is available here.
Note:
For best results, GRUBBRR recommends limiting the landing screen to three rows of content, with no more than three columns per row. This will ensure that all of your assets are clear and easy to see. In our experience, using three rows with one column, three columns, and one column (as pictured above) creates the best user experience.
Landing Screen Layout | Asset Size on Kiosk | Closest Standard Ratio | Ideal Asset Type / Notes |
1 Row, 1 Column | 744×1331 px | 9:16 | Portrait |
2 Rows, 1 Column | 744×668 px | 1:1 | Near Square |
3 Rows, 1 Column | 744×444 px | 5:3 or 16:10 | Wide Landscape |
4 Rows, 1 Column | 744×333 px | 9:4 or 2:1 | Panoramic / Banner |
5 Rows, 1 Column | 744×266 px | 3:1 | Slim Banner |
--- | --- | --- | --- |
1 Row, 2 Columns | 372×1331 px | 1:4 or 9:32 | Ultra Tall Portrait (Not Recommended) |
2 Rows, 2 Columns | 372×666 px | 9:16 | Standard Portrait (Half Screen) |
3 Rows, 2 Columns | 372×444 px | 4:5 or 1:1 | Near Square / Slightly Tall |
4 Rows, 2 Columns | 372×333 px | 1:1 (Square) | Perfect Square Sweet Spot |
5 Rows, 2 Columns | 372×266 px | 4:3 or 3:2 | Standard Landscape |
--- | --- | --- | --- |
1 Row, 3 Columns | 248×1331 px | 1:5 | Extreme Vertical Column (Not Recommended) |
2 Rows, 3 Columns | 248×666 px | 1:3 | Tall Portrait Strip |
3 Rows, 3 Columns | 248×444 px | 9:16 | Standard Portrait |
4 Rows, 3 Columns | 248×333 px | 3:4 | Classic Portrait |
5 Rows, 3 Columns | 248×266 px | 1:1 (Square) | Near Square Sweet Spot |
--- | --- | --- | --- |
1 Row, 4 Columns | 186×1331 px | 1:7 | Micro Vertical Strip (Not recommended); |
2 Rows, 4 Columns | 186×666 px | 1:4 | Tall Portrait |
3 Rows, 4 Columns | 186×444 px | 1:2 | Narrow Portrait |
4 Rows, 4 Columns | 186×333 px | 9:16 | Standard Portrait Miniatures |
5 Rows, 4 Columns | 186×266 px | 2:3 or 3:4 | Small Portrait |